Saturday, October 18, 2014

Tree Decorating Place holders- featuring a folded tree tutorial with the Creative Cafe' KOM

Hi Everyone! Hope you've had a great week! I'm starting off the weekend, with a cute place card idea, show casing those adorable Elves!! Yep they're at it again, and busy at work decorating trees for Santa's delivery!
 
 
Here's a closer look at my finished project -
 
So Grab your favorite beverage and head on over to my post today at The Rubber Cafe' - and read more on, how I make these cute simple trees!
 

Wednesday, September 10, 2014

Halloween Traditions - Creative Cafe' - kit for September

Hi Everyone! Can you believe it but we've been sharing monthly Creative Cafe' kits with you for a year now! That's right it's our first year Anniversary!

This month we've got a wonderful set perfect for all those Halloween projects called Cute & Spooky! And how cute it is, and spooky? Definitely! When you take a look at the stamp set that comes with the kit called Halloween Traditions you'll know why. It features a ghost a line-up of tombstones, bats and spiders all complete with their own spider web!

For my card today - I wanted to create my own spooky scene taken straight from a creepy spooky cemetary!


For more details and information check out my blog post today at the Rubber Cafe' here!

Friday, August 29, 2014

Special Limited Edition Stamp set- Too Cute to Spook!

Well you've seen the Sneak Peek for our September Creative Cafe' kit - Cute & Spooky- but hold onto your broom sticks 'cause I have some more fun to share!

This month - in addition to the Add-on set, we are offering a limited edition set ... regulary priced at $14.99, this special set will be avaiable to our kit club members, for $7.99! It's called Too Cute to Spook and coordinates perfectly with our Creative Cafe' kit - Cute & Spooky  
Check it out!
Here's some fun ideas using this sweet canine treat! Treat toppers for your favorite canine, or kids- I also had some fun with the cute little paper clips that come in the kit - and made some rocker toppers with hershey nuggets! Too perfect!

The limited edition set is available only while supplies last, so be sure to get your's ordered today!

Wednesday, August 27, 2014

Floral Bouquet- 'Pink' Wash and Blackboard technique - Featuring August Creative Cafe' Kit of the Month

Hello! Today I'm back to share what is becoming a favorite technique of mine. Especially when I want to do that almost single layer card!

I came across this when Blackboard and White wash started becoming a fun and new trend. I've changed mine up a bit today as I'm using a pink inks instead of white ink on a black background. And once again, I'm featuring the gorgeous Floral Bouquet stamp set that is included in our August Creative Cafe' kit.
Check this out it's easier to do than you think!
 
 For more details check out my post today over at The Rubber Cafe' here!
 

Wednesday, August 13, 2014

"Pointillism" Bouquet -featuring August's Creative Cafe' kit of the month

I saw this technique last week on Splitcoast stampers called "Pointillism" they also featured a tutorial by Allison Cope here. I thought it was a beautiful effect and perfect 'go to' technique with our Floral Bouquet stampset included in this month's kit so decided I had to give it a try.

Here's a look at my first attempt- I definitely think this technique gets better the more you practice but for a first attempt it doesn't look too bad, so thought I'd share it with you today.

Here's a close up of the flowers - and a look at my first try at Allison's Pointilism technique- it's a fun change of pace for coloring and layering color. To create my bouquet - I created masks for the flowers and leaf so I could layer and cluster away- a great way to get a one-stamp look out of 4 different stamps!

For this single layer card, I layered it with some pink cardstock- leaving just a bare 1/8" around, and than layered that on the polka-dot pattern paper


Monday, August 11, 2014

Creative Cafe' - Kit of the month- August Laurel Wreathe

Hey there! Hope you all had a great weekend! I'm back today to share with you another card from our latest Creative Cafe' kit called, Gold n' Glitz. This is a simple layered card - but I love how how it turned out as I'm using my favorite print from the Market Street pad included in the kit.
Here's a finished look at my card.
To see how I made this card and more check out my blog post today at The Rubber Cafe' here!
Thanks for stopping by! More fun to come so keep checking back with us

Wednesday, August 6, 2014

Creative Cafe'- August Kit of the Month- Pocket full o' Posies!

Hey it's a new month and with that brings us to a new Kit release! August's Creative Cafe kit of the month is called Gold 'n Glitz- and it's a beauty!

Using the coordinating Floral Bouquet stamp set that comes wth the kit I created a very simple pocket card - that when pulled out reveals the message inside.  I think you could stick a gift card in this sweet pocket as well. 


Here's my card with the insert tucked in  I layered my flower pot on the outside - creating this beautiful bouquet!
All of the flowers, leaves and vase were stamped on printed papers from the My Minds Eye paper pad also included in the kit! I fussy cut them out - and using Distress Inks -distressed and inked the edges to create more depth. 

Using another printed paper from the pad, I created the insert to match the angle points of the pocket. When the insert is pulled out my simple "Thank you" sentiment is revealed, this is from the Add-on set Laurels.
Check out my post here at the Rubber Cafe' to see how I made this easy pocket card!
 

Friday, July 11, 2014

Mermaid Shell Shaped Card - Featuring Creative Cafe' Kit of the Month

Hi Everyone-

I love shaped cards, and while I usually reach for my Silhouette Cameo to help me create and generate my basic shape, I have also used punches and other objects like bowls and plates to trace and get me the results I need.  Today I'm using a shell shaped cookie cutter that I found in one of Michaels' $1.50 bins.  I think you could build a scene and alter it with some mixed media products as it's got this great color.  But before I altered it I wanted to use it to trace and shape this card.

First here's a look at my finished card
  
I used the shimmery blues for my card base - and to get the softer blue layer, I just cut away aprox. 1/4" in from my trace line of the cookie cutter.  In the base card I kept one side along the fold of my cardstock which is directly inline where my cute little mermaid is sitting.


See more details on my post over on The Rubber Cafe here!


Tuesday, July 8, 2014

Happy Birthday pocket gift card featuring Origami folded money Shirts

Hey!
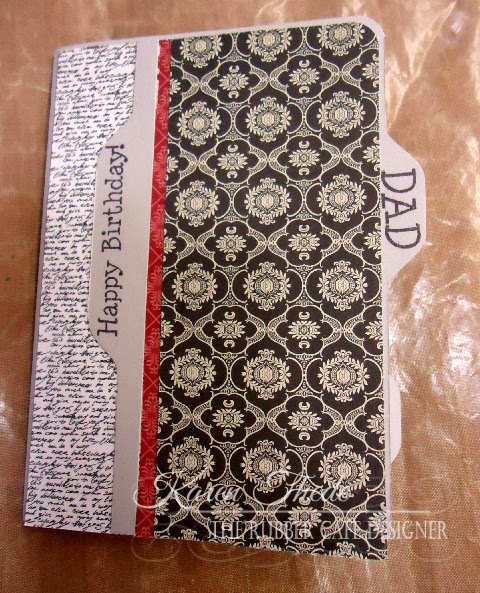
I have a fun birthday card for my Dad, featuring Stamps and Paper from our Creative Cafe' kit for June at The Rubber Cafe'
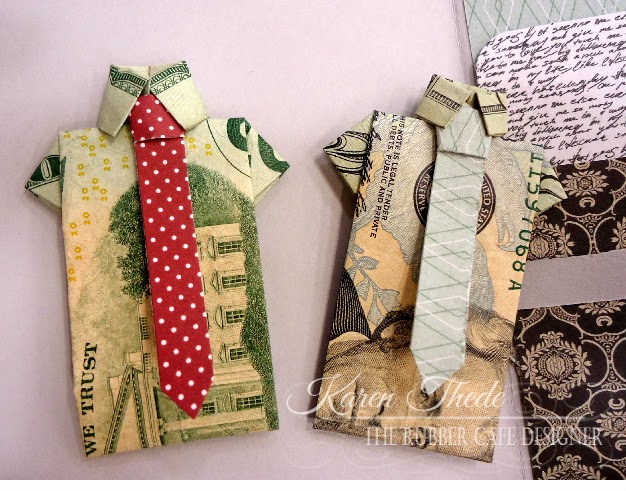
For a year now, I've been trying to find how to fold money origami style into shirts I saw it once last year, and then when I looked couldn't find the site I liked so well.  I just love the creative way you can give cold hard cash to that special someone!  Well I've been keeping my eyes, open, and then one day watching The Chew - they were doing a Father's day segment, and in addition to grilling tips, they made this folded card - yes, that's right an Origami shirt!  So head here- to the CHEW to see their video clip, I just applied the same techniques to my money!  I think these should make him smile in more ways than one- when he receives his card in the mail.

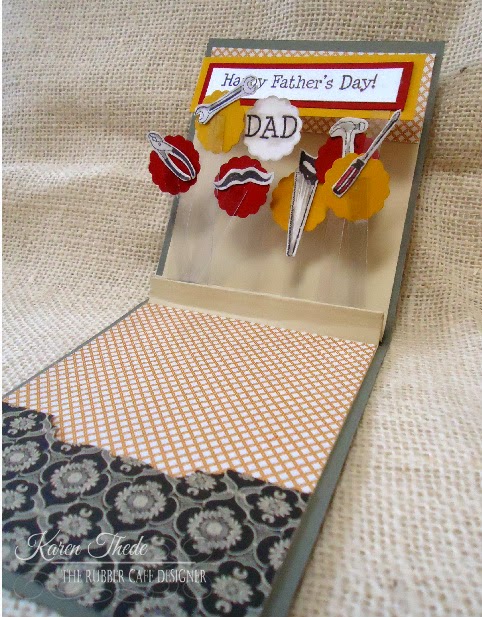
Here's a look at the front and inside of my card.  I used my WR Memery Makers Envelope maker to cut the tabs, and create a fun file folder card.
I am using all supplies and stamps from our June Creative Cafe' kit - I think the papers I chose just blended perfectly with my folded bills.  We had an old pickup truck like the one I colored and 'wobbled' in the lower RH corner. It came with the 40 acre farm we bought it was a 55 pickup, that I had to learn to drive so I could get to and from the farm to do feed and muck stalls for our horses. 
The wobblers were also in the kit last month- and I had so much fun adding movement to my cards.  The coils fold flat so I should not have any problem getting this in the mail.
 Here's a closer look at my shirts!  I had to add some ties, as my Dad was a shirt and tie guy before he retired.   I had so much folding these I may get a few more bills to fold and add to my card- I think my Dad is worth it!  
Thanks for stopping by - Keep checking back as we are showing our latest kit for July and it's another winner!!
Supplies:
Stamps:  Creative Cafe' Kit of the month - June
Paper: Creative Cafe'kit of the month - June - featuring Echo Park's Getaway Paper pad
Ink:  Memento Ink - Rich Cocoa
Tools: Envelope Maker-(used to cut my folder tab card)

Monday, June 23, 2014

Keep on Truckiin 'n Wobblin' -- Creative Cafe' Kit

Hi Everyone!  I've got another card today using those fun 'wobblers' included in this month's Creative Cafe' kit.  Here's a look at my card, I'm also featuring that wonderful old pickup truck.

To make this card- I'm using a simple easel fold card.  I love this card type as your card is always able to stand on display when it's open.  I also like the versatility.  It folds flat for mailing, and you can create a pocket on one end, just right for tucking in a message or gift card.

For more details - head on over to my post today at The Rubber Cafe' here!

Wednesday, June 11, 2014

Creative Cafe' - Kit Gone Fishing

Hi Everyone!  I have a fun Father's Day card using those fun wobblers that you'll find in this month's Creative Cafe' Kit - "Let's Hear it for the Boys!"  for today's card I'm featuring the add-on stamp set, Gone Fishing.    
Here's a look at my card- with a view of the inside in the lower RH corner.
For more details on how I made this card - head on over to my post today at The Rubber Cafe' - here!

Wednesday, June 4, 2014

Creative Cafe' Kit - Let's Hear it for the Boys! Standing Shapes Gift card

Hi Everyone!

Let's Hear it for the Boys!!  That's the name of our new kit this month - and it's a fun one!  So to help you get busy creating some cards and tags for those 'Boys' out there the Design team has been busy at work to give you some ideas using this month's Creative Cafe' kit.

To start off - I've created a fun gift card, that frankly looks harder than it is! It's called a Standing Shapes Card on Splitcoast - and I love how my images look suspended in air, when it's open!

Here's a look at my gift card closed -

And when it opens - not only does it reveal a pocket for your Gift Card, but a fun surprise of  tools and a popped up greeting waving away!

To see more details on my card head over to my post today at The Rubber Cafe' here!

Monday, May 26, 2014

Happy Decoration Day! featuring Creative Cafe' Kit of the Month

Hi Everyone!  Hope you're all getting in sometime to do what you want to do today- as we surround ourselves with family and friends let's also remember those men and women who have died in the service of their country. Here's an added piece of trivia!  Did you know that Memorial Day has also been known as 'Decoration' Day?  So how appropriate is it that I share a card today that features a decorated  cake!


 I really love how this "sweet" card turned out - and even more how simple it was!  With the wonderful cuts and score of this card it easily showcases your image and looks marvelous!  To see the full post and tutorial head over to my post at the Rubber Cafe' blog here!

Thursday, May 22, 2014

May Kit of the Month- Ice Cream truck party favor & Invitation

Hi Everyone!  Today I'm sharing a couple of projects featuring the May Creative Cafe' kit How Sweet it Is! - and the add-on stamp set Always Room for Ice Cream.    I created a gatefold type card, that would work perfectly as a party invitation and for fun I paired with it a party favor in the shape of a truck.  I first found this free template from Clear and Simple stamp site.  But I've tweeked the size as I wanted my truck longer and added a base so I could easily stick lots of goodies in side.


 Here's a closer look at the invitation- as it looks closed with the decorated belly band wrapped around.
 

For more details-and a tutorial see my post today over at The Rubber Cafe' here!


Monday, May 12, 2014

May's Creative Cafe' Kit of the month - Cupcake Gate Fold

Hi Everyone! I'm here today to share my first project with you featuring our May Kit- How Sweet it is!
It's a sweet card made with a simple gate fold. Featuring the stamp set included in your kit- Make Life Sweet. I used the cupcakes from the set to overlap at the card opening.


 Here's a little closer look....
Check out my post today over at the Rubber Cafe' - for more details here!

Wednesday, April 30, 2014

Tulips in Spring Time

Hi - I'm here with one quick last post featuring our April Creative Cafe kit-

Today is pretty simple - I used a lace doily as a template and created a border with Ranger Distress ink; Broken China. To balance my card I trimmed the bottom with a curved edge.
.

For more details see my post today over on The Rubber Cafe' -here!

Thursday, April 17, 2014

The Rubber Cafe' - Easter Treats

Hi There! I'm sharing some fun treat baskets with you today - these projects all feature products from our April Spring is in the Air Creative Cafe' kit, and the Add-on stamp set "Happy Spring"!

 
To get more details and how I made these baskets and carrot treat holder check out my blog post over at The Rubber Cafe' today here!
 

Monday, April 14, 2014

The Rubber Cafe's April Creative Kit of the Month- Spring is in the Air

  have a fun framed card today - featuring the stamps paper and embellishments from April's Creative Cafe' kit- Spring is in the Air. This month is so bright and cheery for those of you who have been experiencing the long winter will especially be ready for this one!
 
My card today is built on layers and layers and more layers- Featuring our exclusive clear set "Dancing in the Rain" included in your kit!
For more details and brief tutorial on how I made this card head on over to my post today at The Rubber Cafe' blog here!


Monday, March 31, 2014

The Rubber Cafe's Cherry Blossoms

Hi Everyone! I was with some friends paper crafting and scrapping yesterday - and while I was there finished this clean and simple card! It's sweet and simple but still full of some fun techniques I've been wanting to try or do more with. First of all I wanted to try out my new glass bottle Sizzix die that I bought last weekend at the Anaheim Scapbook expo. Teamed with my simple Blossom stamp, I was on my way!

Here's my card-
Using the Blossom Branch stampset I stamped this on white cardstock - lightly colored in the blossoms with my copic and fussy cut it out. I diecut my glass bottle from some acetate packaging and using my copic marker, colored it to look like green glass. 
To see more - check out my post today over on The Rubber Cafe' blog here! 

Wednesday, March 26, 2014

Paper Dolls!

I can't believe it's already been a couple of weeks since my weekend up on Palomar Mountain!  Every year, I get the chance to get -away with wonderful friends to paper craft, laugh, relax, eat and  have fun! 

This year, I made eveyrone nametags for their door, featuring Julie Nutting's Paper doll template.  I have several of Julie's stamps, but I love the flexibility the template gave me. I had so much fun creating, and dressing these little gals to look like my good friends.  I was able to even customize their hair!  Check them out!  Those fun chalkboard stakes I found at a local store Paper Tales!  And I mounted them on tags from Julie's line made by Prima.

 
Unfortunately I couldn't get anyone to pose with their paper doll 'likeness' so you'll just have to take my word for it that these resemble any of us in any way! :)


I added flowers using Tim Holtz' Tattered Flowers die, and vines and buds that grew up each post. 

 
I used brads to join and 'joint' the arms, and legs, keeping them very mobile.  However noone was going anywhere once I attached each of them to the tag front!

 
They went together pretty quick, however I have to say creating their clothes and dressing them took longer than I thought.  I think I was just having too much fun going through all my small 6x6 pads (yes, I have way too many) and finding just the right prints and colors for each of little 'dollies!. 

 
Thanks for stopping by!