Tuesday, March 27, 2012

The Rubber Cafe' - Fun with Origami

Today I've got a really fun tutorial to share with you.  I love making my own flowers and few years ago, saw these in a book on the art of Origami paper folding I picked up at a Thrift store.  I didn't make them at the time, but they stayed with me, and when I saw Connie McCotter's card, in Card Maker magazine  March- Flower Power! issue, I was inspired again to give these a try!

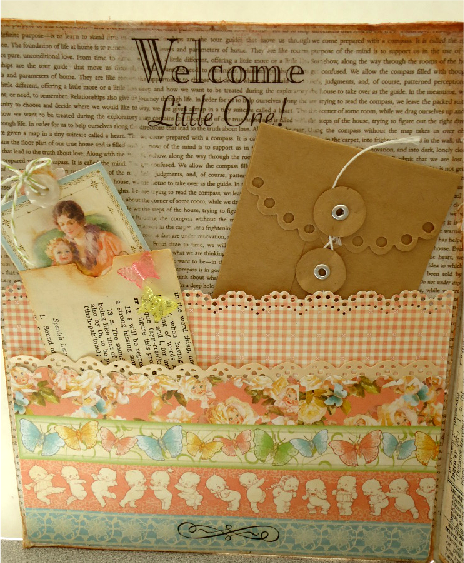
First of all here's a look at my finished card.  I'm a little disappointed in my picture quality so hopefully you'll still get an idea of how fun and pretty these are and be inspired to add these to your own cards.

I stamped my Thinking of You from The Rubber Cafe' Fabulous Phrases stampset directly inside a label already printed on my paper.  I layered several different prints and coordinating papers to this print, and adhered to my card base creating my back drop for the flowers themselves.

Here's a little closer look...  I used homemade paper, that I dyed and colored with Ranger Distress Inks. I really loved how this paper worked in the end, as it was so light and easy to fold on such a small scale.    Since you need five of these per flower, I just wasn't happy until I got it down to an 1- 1/2" square.  I have seen some made with 2" squares so you just have to see what fits for your card.


OK,  let's get folding! - As I said earlier they are made up of 5 petals, that you will glue together to make up one flower. I suggest practicing first with a much larger square like 3 or even 4 " square- so you get the feel of how the folds come together.  By the time you complete 2 or 3 you'll be a pro!

1.  Start with a Square piece of paper.  Preferably double sided, prints or something you can dye yourself like I did. (I don't like the white side showing that some print papers offer) you may even want to give the Origami papers a try as well.
(My pictures and samples for the tutorial, are cardstock wt, and 4" square, to make it easier to follow)


2.  Fold in half and form a triangle

3.  Bring both your 45 degree points of your triangle from each side so they meet together and come to the lower point.  So you have what looks like floppy dog ears.


4. Now you need to open those so that edge fold is now in the center on both sides.  It reminds me of kites, laying next to each other.  Hint: If you need to get the point of your tail to lay flat use a darning needle or stiletto.


5.  Next take each side and fold the points back to make a flat edge or small triangle


6. Hang in there we're almost there!  Fold in from the each out edge so you are folding your kites on each side in half. Remember each fold is done on both sides.  (This is forming the inside portion of the flower)


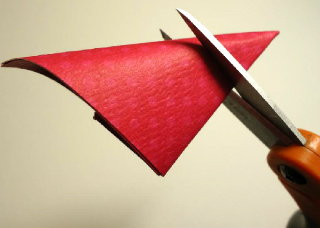
7a.  Now do a soft fold, YOU DO NOT WANT TO SCORE OR CREASE THIS FOLD! You're going to bring your two outside edges together as you see below, and hold it towards the base, with your thumb and forefinger so you leave a nice soft curve fold which makes the larger outside petal of the flower. 


7b.  You'll need to glue these edges together, the Scrap Happy Glue worked great for this as I was able to get a small bit of glue right where I needed it.  Hold it a bit, until you can see it's holding on it's own and set it aside to work on the next petal. 

8.  Once they've set up and dried you're ready to trim the bottom of each petal before you join them, this will help give you a flat surface when you're ready to attach your flowers to your project.  


Now repeat steps 1-8 4 more times.  When you've completed 5 petals you're ready to glue each together on each side to the next petal forming a circle,  

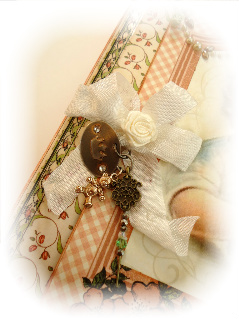
To finish the Centers - I used our Candi's in white and colored them to match using the same inks I used to dye my paper.   I used Scap Happy glue again, to place them on my cards, grouping them with some Spellbinder die cut leaves.

I hope you'll give these a try, they're a fun alternative to all the other roses and flowers you can buy, and makes that very special one of a kind card for someone special.

Supplies Used:  All from The Rubber Cafe' be sure to check it out!


Thursday, March 22, 2012

How Sweet it is!

Hi Everyone!

Today I have a simple card but I just love how it all came together so I'm very excited to be able to share this one with you. I also thought it most appropriate as I throw out a big Happy Belated Birthday wish to Melissa over at The Rubber Cafe'!

For this card I used the 'Through the Window' stampset again only this time I teamed it up with the 'Sweet' stampset, and by turning the window on it's side, created a sweet view through to my bakery shoppe!

Using black Memento Ink, I stamped the cupcakes and goodies first and than stamped the window pane directly over that. I finished the window by coloring it in with my copics, and topped it with some lace paper. I popped up the word 'Sweet' to give it some more dimension as well as the solid stripes of my awning. A lot of paper layering later, and I was done! Over all pretty simple and sweet don't you think?


You can find both of these stampsets online at The Rubber Cafe'.

Thanks and enjoy the rest of your week! 
~Karen

Wednesday, March 14, 2012

Iditarod 2012 Day 10 and we have a winner!

The Iditarod in Nome Alaska has just finished up after 10 days and 980 miles in Nome Alaska.  I've been paying close attention this year, as my company has been a proud sponsor for Dee Dee Jonrowe, who finished 10th!  She's competed in a total 30 Iditarods, (more than anyone) where she's finished in 2nd place twice and been in the top 10 thirteen times! 

Here she is with her dogs getting close to the finish today day 10.  I love their pink booties, and times I've seen them with matching coats too!


Here's another view of her at riding off into the sunset.... you can almost make out their pink coats!


Finally here are the winners!  Dallas Seavey with his 2 lead dogs. At 25 he is the youngest winner yet of the Iditarod! Some more interesting pieces of trivia... his father placed 5th in this same race, and his Grandfather mushed in the very first Iditarod (must be in the genes)!


Thanks for stopping by... I'll be back with something more crafty in my next post!
~Karen

Saturday, March 10, 2012

My Heart is Full of....

This is a special project that I made for someone very special to me.  My Sister!
I happened upon Julie Nutting again where I noticed she was scheduled to teach classes at Gee Gee's Stamps 'n Stuff  located in downtown Carlsbad, CA.  Sadly I could not take her class, but was inspired to try my own version.  I've also been anxious to make another mixed media project like the one taught by Christy Tomlinson, during CKU's Reunion event last fall here in LaJolla, CA.

OK so enough chit chat, here's the results of all that inspiration! 


I used my Silhouette to cut and dress my paperdolls, and applied it all to a heart shaped paper mache hanging plague which I decided to use instead of canvas. My dolls are holding a banner between them with charms that complete  the phrase, "My Heart is full of Love, Hope, Joy".
I finished it with Ranger's multi-media matte finish. Sticky Tissue tape covers the sides. (Love that stuff!)
Although I'm pleased with the results, mine does not hold a candle to Julie's creations. She is truly amazing, so be sure to check her out. She also has a new book available on Amazon called Collage Coutour that I definitely will have to add to my wish list.

Oh, I've also been to Gee Gee's since I first set up this post, and Gayle told me that Julie will be back to teach again, so maybe I'll get that class in after all.  So if you're in the San Diego, area be sure to check out the store and her awesome classes she has available!

Enjoy the rest of your weekend, and hope you get to take some time to create!
                                                                                                                             ~Karen


Wednesday, March 7, 2012

The Rubber Cafe' Alchohol Marker Contest on Facebook

Did you know that March is National Craft month!  Well if you needed any excuses to celebrate and get crafting this is the perfect month to do so, and The Rubber Cafe' has started a fun Alchohol Marker Challenge and giveaway going on right now through our Facebook page, so be sure to head over there and check it out.  
In addtion to that Papercrafter's Corner, is sponsoring Alchohol Markers week, where you will have access to tutorials, and a chance to enter for their giveaways, one great prize is a $20.00 Gift Certificate from our store The Rubber Cafe'.  How great is that!! 


More details can also be found on our Rubber Cafe' Blog, where the team has also put together some great cards to inspire you.  So get going there's still time this month to get crafting and join in the fun!


Tuesday, March 6, 2012

Graphic 45- Lil' Darling Shadow box

Today I have a Shadow box that was made as a gift for some dear friends who just had the gift of a new Granddaughter!  The Graphic 45 Lil Darling paper was just perfect for my vision in re-purposing this candy box I had.  I wish I had taken a picture of how it looked before I covered it with this sweet, sweet paper,  but basically it was covered in home made paper, with smaller dividers I removed. Initially I had plans to just simply embellish the box. however it became pretty clear that it needed to be covered, so that is what I did.  I love how this box turned out, and so excited to share it with  you. 


I made a little mini album to fit inside the cut-out of the box, for pictures to be added later.


                                                                                                                                                                On the inside lid, I've included pockets for other memorabilia, or photos to tuck inside. A Maya Roads pocket for a lock of hair or some other small item is tucked in a pocket as well.

Here are some more close- ups...


I posted this also on the Graphic 45 gallery- check it out for more wonderful projects using G45 paper. http://graphic45.ning.com/photo/albums/g45-lil-darling-shadow-gift-box

Thanks for stopping by....  Karen


Monday, March 5, 2012

Through the Window (and Door)

Hi Everyone !
Hope you all had a great weekend- I'm just getting back from a fantastic weekend retreat where I was with some of my best friends, enjoying the mountains, and best of all 3 days of uninterrupted cropping and stamping time. 

Anyway, do you recall this sneak peak photo from my post l ast month for the Rubber Cafe Blog?

Well as promised here's my card using The Rubber Cafe's stamp set Through the Window.

By combining the window stamp with a frame work, embossing folder I made my card into a Door!
I started out by stamping my window frame on the reverse side or back side of my cardstock. I than took my stylist and a ruler and traced the lines of the stamped window causing it to 'raise' or emboss on the right side.
To finish, I inked the raised embossed areas highlighting the framework and window.
I used a Spellbinders diecut for my house number, and added both resin and silk miniature roses to create a decorative swag as a finishing touch!  For added interest I embossed the same frame to the inside of my card, which you can see from the close up picture at the top.

The elements to this card were inspired by my own front door. I love adding a special wreathe, garland or sign to match the season on my front door, and I also have a miniture flag I switch out as well.
Thanks so much for stopping by and have a great week!
Karen


Stamps:
Through the Window - The Rubber Cafe

Ink:
Ranger's Distress Ink- Tea Dye