Saturday, October 31, 2015

Santa's List


Happy Saturday Everyone!  It's Halloween today - but I'm going to share with you a Christmas card from this month's kit cause it's such a terrific kit! 
 
Today I played with layers and border dies.  I love the prints in the paper pad from Echo Park that you get in this kit so much that I wanted to use as many as I could in today's card.   First here's a look at my card that I'm calling Santa's List.  

 
To see more details on how I made this card, head on over to my post today at The Rubber Café.
 

Saturday, October 24, 2015

Gingerbread House - with Reverse Window

Hi - today's card I'm using the stamp set Home for the Holidays that comes along with your kit, I just love the houses and cluster of trees so had to create a little scene with them.   

Here's my card-
 
See more details and how I made this card on my post here at The Rubber Cafe'.


Saturday, October 17, 2015

Christmas 3 x 3 note cards with matching envelopes

Happy Weekend Everyone!  -  Today I'm posting my first project using our latest kit from the Rubber Cafe'!  called Creating Christmas- so appropriate, for this amazing kit as it's filled with wonderful stamp images, and the perfect 6x6 pad from Echo Park to provide you lots of inspiration.
 
Here's a look a my notecard set.  These little sweeties are too cute measuring 3 inches square, and have their own matching envelopes as well, these would be great to put on any package or gift of any kind! 
 
 
 And since the printed paper pad from Echo Park's - Christmas is coming, is printed on both sides, when you make your envelopes they will be as if they have their own customer liner.
 
 
Check on over at my post on today with The Rubber Cafe' here to see the rest of my post.


Saturday, October 10, 2015

3 Ghosts in a Row

Today I have a fun fast card to share - using once again my favorite thing diecuts and my Creative Café kit - this is from our recent September kit of the month, but since it's not yet Halloween, I would still love to share this with you!


First here's a look at my card!
see the rest of my post here -


Thursday, September 24, 2015

Happy Halloween Spooky nights - coloring textured paste and stencils

I've been playing around with different techniques, and today's card features one of those!  This combines, stencils, distress ink, and textured modeling paste to create the fabulously spooky background of my card!  Topping it off with the Happy Halloween phrase from the stamp set in this month's Creative Cafe' kit- was all my card really needed.

First, here's a quick look at my finished 5x5 card!
 
 
To see my tutorial on how I created this card head on over to The Rubber Café here!

Saturday, September 12, 2015

Mad Scientist Tag- Featuring Creative Cafe' - Kit Monster Bash

Hi Everyone!  This month's Creative Café kit has endless possibilities for all your Halloween creations!  This week, I'm working with the add-on set called Monster Lab!  I just love the Mad Scientist in this kit, and couldn't help but feature him in my first project this month.

I decided to make a tag and got out my Silhouette Cameo, and all my distress inks to help create the fun elements of my tag.  Here's a quick look!


Be sure to head on over to my post today at The Rubber Cafe'- to see the techniques behind this tag.


Saturday, August 29, 2015

Using Diecuts to Create a Layered Card around Negative Space

I love using punches and die cutting in my card and paper crafting projects - I'd have to say it's an addiction with me!  So I'm always looking for different ways that I can do just that to create a simple card.
Here's my card today - I saw this idea awhile ago watching uTube, and decided to give it a try with today's card.


I used a Nestabilities die to create my window or negative space however you could achieve the same with a punch or even a x-acto knife.  The key is to pop-up the top portion of the piece with the window and layer behind it another piece of white card stock the same size.  Giving you dimension and an element to work around on your front layer.
 see the rest of my post over at the Rubber Cafe' here!


Saturday, August 22, 2015

You Make me Happy!

Hi Everyone! 
Today I'm sharing  a card from the last months' kit -   I just love the phrases from he add-on set last month, and I also played around with creating a distress ink background.

To start here's my card:

 
To see the rest of the post head on over to the Rubber Café here
 

Sunday, August 16, 2015

Farm Fresh Diorama Card- Creative Cafe' - Kit for August

Greetings Everyone! -
This month's kit is a fun one and today I have a Diorama card for you that works just perfect with all the scene building stamps in the Home Grown and add-on Farm Fresh stampsets.
 
Here's a look at my finished card...
If you've never seen these or made one before - they are so great for providing layers to your card, yet still allow you to fold flat for mailing!  Head on over to my Rubber Cafe' post here and see how I put this together!
 

Saturday, July 25, 2015

Too Much Sun- Citrus Wreathe

It's the weekend again - and I'm back to share another card using our latest kit from the Creative Cafe's- Too Much Sun!
Today I decided to make a wreathe out of the lemons!  You know what they say when life gives you lemons... well I made a wreathe instead of lemonade.
 

 To see how I put this card together - head on over to the Rubber Cafe' blog here!


Saturday, July 18, 2015

Creative Cafe'-Toomuch sun Card set and box

Hi Everyone!  Happy Saturday..   Today I have a quick post to share - these are some fun and easy note cards I made using this month's Creative Cafe' kit- Too Much Sun!. 
 
Today I'm featuring the add-on set;  The Perfect Sentiment, and I just love this set- and perfect it is for these everyday greeting cards, using the sentiment "best wishes".   
 
Here's a look at all 4 of my cards together. They are a perfect 3x4 note card- using the gorgeous solid card stock from the kit and mounted on a white card.
 
 
see the rest of my post over on The Rubber Cafe' blog here!

Sunday, July 5, 2015

Bold & Beautiful Tote- striped Crochet tote

Hi - I hope everyone had a safe and happy 4th of July!  Today I'm moving away from a paper crafting project, and instead thought I'd share bright bold crocheted tote I just finished up!
I've been working on it over the last few weeks- it's been easy to pick up and work away at while I watched TV - I've been super busy at work, and with the long days, it's been something nice to work on to clear my head before going to sleep each night.
 
I got the pattern for this from Crochet World it's almost all of the same colors- but I also changed the pattern up in that I could not get clean straight vertical rows - like you see in the upper half of the bag on the original pattern from Crochet World - Aug 2014
  
 
now here's a look at mine- I used a lot of my yarn stash up, and what I purchased was Red Heart worsted wt.  I love the colors they used, but I did replace the Orange and Corals with Reds, that I purchased as I could not find the right colors.
 
You'll also noticed I did not do any of the vertical stripes, I found I could not get them to stay nice and straight and I think that is from the different types of yarns, some were softer then the Red Heart yarn, and made it challenging to keep the panels from getting wonky so I opted to keep all the stripes  horizontal.
 

a closeup of the rolled roses I made- I used to distract from my less than perfect joined rows.


Saturday, June 20, 2015

Independence Day Clean and Simple Style, and die-cutting with a twist!

It's the weekend again!  And today I have a very 'clean and simple' card to share.  I typically don't attempt 'clean and simple', but with this red, white & blue color pallet and the die-cutting techniques I wanted to feature seemed to work together really well.
I've used 3 different die-cutting techniques in this card - cutting an opening or window; using my die to create my card shape, and a fun technique that I've wanted to try for some time now that I'm calling 'die emboss'  first here's a look at my card -

Head on over to my post  today at The Rubber Cafe' here to see more!

Saturday, June 13, 2015

Pinwheel Fun Fold - featuring Creative Cafe' kit Home of the Red, White and Blue

We here at the Rubber Cafe' - love fun folds!  And I just love it when I find one that I've never seen before let alone made.  So I was super excited when I saw this one recently shared over on SplitCoast Stampers.  It's called the Pinwheel Fun fold - and here is mine!
 
I really hope you will give these a try, they were really fun, and quick! I have a full tutorial over at The Rubber Cafe' blog here -
 
 Thanks for stopping in-  have a great weekend!
 

Saturday, June 6, 2015

Liberty Hat Party Favors - featuring Creative Cafe's Kit of the Month

Hey Everyone!  - Start preparing for this upcoming 4th of July festivities with these cute little Liberty Hat Favors - you can fill them with candy or a small styrofoam ball like I did allowing you to stick fun party elements or photos you create!
Here's a look at a couple of these together - the basis of these cute favors is toilet paper rolls!  Cutting them in half gives you two!

  
Check out my post today at The Rubber Cafe' -here!

Sunday, May 24, 2015

Stamping on patterned paper Grad card - Creative Cafe'

Hi Everyone!

I have a fun and simple layered card today that I think would be a perfect card for that special Graduate in your life as well.

I've combined some simple stamped phrases with the patterned paper from our kit -MME -Hello World!  And that piece is built on a background piece of  yellow cardstock cut 4 1/4" x 5 1/2, with 2 rows of cars bordering on each side.

So here's a look at my finished card, follow-along and I'll tell you how I constructed this simple card.


Check out my full post over on The Rubber Cafe' - here-
 

Saturday, May 16, 2015

Travel Journal Part 2 -

Hi Everyone!  Well I'm back this weekend as promised to show you how I finished the inside of my Travel Journal.  For those of you who just tuned in, here's a link to the tutorial here that I created last weekend as well as a view of my cover below- 

 
Follow along and I'll share how I finished the inside.  First of all my notepad was originally a Class Assignment Schedule notepad, so there are dates I wanted to reuse but I wanted to cover up the word 'Assignment'  at the top of each page.   Second, these note pages are very light weight and I didn't want to have ink leaking through to the other side, so before stamping I took my ATG tape runner, and adhered 3-4 pages together still leaving m 10-12 days for journaling my trip!

With my pages prepped, I went ahead and started stamping.  For the global image below, I first masked off at the line to only stamp in the upper margin as you see below.

 
Get the rest of my post and tutorial on how I completed my travel book here
 

Saturday, May 9, 2015

Travel Journal Tutorial - Featuring Creative Cafe' kit for May

Happy Saturday Everyone! Today I want to share with you a quick tutorial on how I created a Travel Journal using a purchased notebook from my local grocery store office supply area. Here's a look at the front of my finished book - the ribbon you see coming out of it at the bottom is a bookmark I inserted along the way! 


 Head over to my post today at The Rubber Cafe' - to see the tutorial and more!

Saturday, May 2, 2015

Desk Organizer Using Topography Line from G45

Last weekend, I went to a Charity event for the Pregnancy Resource Center in Vista called Crafting for Life- this was their 5th Birthday, and we managed to raise roughly $27,000.00 dollars.

The past couple of years, I've attended and assisted my friend Gloria Stengel, (check out her class on her blog here) as she always graciously donates her time and supplies to teaching a few classes during the event.  This year, I went just as a normal participant, so I decided to work on a project I saw a few years ago, from one of the G45 Designers- Olga Struck,  I loved that it just required a few papers from the line and something I already had in my 'stash'!  Her creative slant to making each container look like a book was ingenious!  To embellish I went again to my stash and pulled out some metal embellishments and wooden numbered buttons to give them some added character.

Here's a look at mine - if you want to see how to make these Olga has a tutorial over on YouTube here, that's easy enough to follow-  I admit I had some trouble using her measurements, so kind of went on my own there.


I made 5 - and as they stand they are loose and not connected.  I'm toying with the idea of creating a base for them to be anchored to.

Here's a little closer look -
I also think I'm going to put a layer of Rangers' Glue 'n Seal to help give some more durability.

 Thanks for stopping by - hope I've inspired you to give Olga's Desk Organizer try!


Saturday, April 25, 2015

Shadow box tutorial featuring the Creative Cafe's -kit for April

Hi Everyone!  This week I'm back with a fun project to share using of course this month's Creative Cafe' kit - Good Times to Follow!   I love Vintage, and this kit is screaming just that - so I had no choice but to come up with something where I could incorporate some of my vintage photos with these great images and papers included in the kit.

 
The foundation of my project today are shadow boxes that I created with the cardstock included in the kit.  I love the size of these sweet shadow treasures, and even more how they turned out!  Even more I loved how easy they were to create. So I didn't stop at one and made two!!

To create your own shadow boxes I put together a little step by step tutorial for you to follow over on my post today at The Rubber Café.

Saturday, April 11, 2015

Reversed Layers- Creative Cafe' Kit of the month - Good Times to Follow

Hi Everyone and Happy Spring!!
Today's card is a simple pretty card full of layers - I'm using the featured stampset Vintage Findings included in this month's Creative Cafe' kit, Good Times to Follow.  


to see how I created my reverse layers and coloring, head on over to my Rubber Café blog post here.

Wednesday, March 11, 2015

Creative Cafe' - Spring is Here! Easter Treat Baskets

Hi Everyone!  Today I'm going to share some "sweet" little treat baskets that you can share with family and friends, and would make a wonderful addition to your Easter table this season!
 
 
To see my tutorial on how I created these cute baskets - head on over to my post today on The Rubber Café blog here!
 

Monday, March 9, 2015

Creative Cafe' kit for March -Spring is Here! Bokeh Ink technique

Hi Everyone-

Hope you remembered to move your clocks ahead this weekend!  It's that time again and yes, that means 'Spring is Here'!  Which is perfect because this month's kit over here at The Rubber Cafe' is called Spring is Here- and it's a wonderful kit full of spring papers and stamps for Easter and other occassions - so if you haven't already subscribed, there's still time to get in on all the fun just go here!

For my first card today - I'm featuring a fun ink technique. (You'll see this post also today over at the The Rubber Cafe' blog here.)
I'm only using the papers and stamp sentiments this time- as it seems simple graphics seemed the best.  
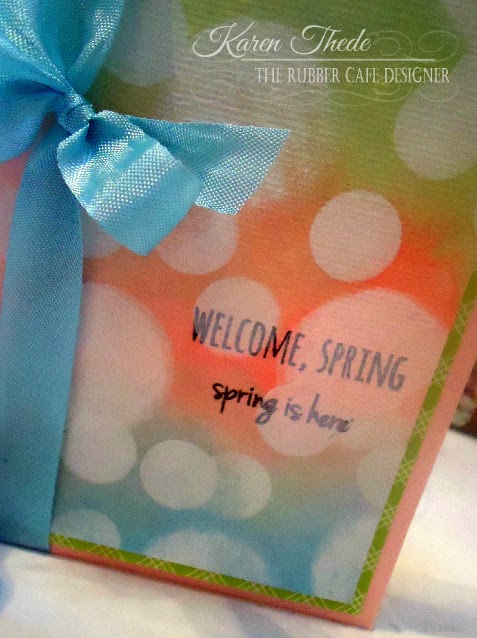
Here's my card -
 
This is a 4 1/4 x 5 1/2 " card so my card base was cut at 4 1 /4" x 11 and scored at 5 1/2".
For my layers, I have a Pink Cardstock at 5 1/4" x 4 1/8"
and a Green patterned paper from the pad cut at 5 1/8" x 4"
 
For the Bokeh ink technique- I decided to used water color paper - I've seen this technique used with all type of inks, so you should checkout all the varieties out there and find what works best for you.  I really wanted the water color look, as it reminds me of Easter dye when coloring eggs!

 
I'm sorry my camera battery died before I could get pictures of this process so I'll describe the best way I can on how I did his technique.  
 
Preparing your water color background:
 
To begin:  I cut a piece of water color paper at 4 1/2 x 6-  and taped it to my craft mat-
  • I washed the whole surface with water using a fairly large brush.  This helps the ink move around on the paper. 
  • For my inks I used Rangers' distress inks - Mowed lawn; Broken China and Worn Lipstick. 
*Tip:  The colors will dry much softer and as I found when I first started with more pastel shades - like shabby shutters, pink, and tumbled glass and they were just not vibrant enough so I re-wet my paper and added the colors above. 
  • Then I took each ink and applied it directly to my craft mat and spritzed each with water - with a wet a brush I just applied it to my paper- and allowed it to move around as it wanted.  I didn't let them blend too much - but made sure I had all 3 colors and that my paper was covered fully with ink. 
  • Where there was too much pooling of ink I took a dry towel and blotted it up.  You can also spritz again with water if you want to create more movement.  Distress ink reacts well to the water so really easy to work with.
  • I let this dry - you can also take your heat gun to your paper to speed up the process. 
Creating the White Ink circles: 
  • Next for the Bokeh affect - I used my Wedding Dress white ink from Memento-Luxe.  You want a wet pigment ink that will be fairly opaque, a couple of other inks that I have tried and that work just as well are Memories Unicorn Ink and Stampin'UP! White Craft ink.
  • For your circles you can use a purchased template or punch circles in paper to create your own.  But I found something even easier and just as effective was my circle sponge applicator from Ranger, w/ a clean sponge; and a clean small finger tip sponge!
  • I started with the larger circles first you want to lay down ink in different intensities.  I just used my applicator like a stamp to create the circles.  For less intensity I used it again w/o re-inking.  I repeated this with my smaller finger tip sponge applicator, randomly spacing my circles and overlapping as well.  I left more of my colors showing then I've seen in some, so it all depends on what you're happy with - you can cover it more with less intensity or coverage.  You'll know when your done!

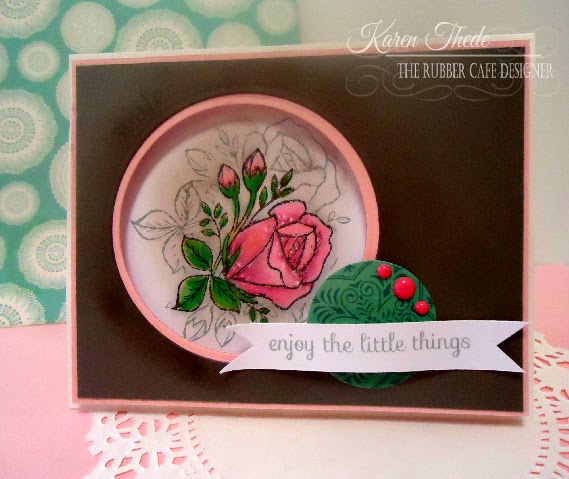
Here's a close-up look at my card - 
 
 
To finish once the white ink had dried.  I used the Welcome, Spring and spring is here sentiments from the kits coordinating Stamp set Egg-stra Special.  I stamped with Memento ink. I think maybe after seeing my ink looking a bit like it's absorbing into the white, I should have used Archival ink for this step.  I think that would have stayed on top better. 
 
Tip:  I also used my heat gun in this step to make sure it was really dry before stamping my sentiment.
 
I layered and assembled my card - added a blue ribbon from the kit with a simple bow.  Here's another look at my finished card.


Thanks for stopping by- and I hope you'll give this technique a try - you'll be amazed at the different effects you can achieve just by changing your ink colors and intensity.  It's fun, easy and makes an amazing background for any card or project! 
 
Be sure to keep coming back this month - as the team has some amazing projects to share featuring this Month's Creative Cafe' Kit- Spring is Here!

 
Supplies:
Stamps:  The Rubber Cafe' - Creative Cafe' kit of the month -Spring is Here  Egg-stra Special stamp set
Ink:  Memento-luxe Wedding Dress; Memento Black tuxedo; Ranger Distress Inks: Mowed lawn; Broken China; Worn Lipstick
Embellishments:  Blue ribbon from the kit
Tools: Ranger small round applicator w/ sponge; finger tip circle sponge applicator; heat gun; Ranger non-stick craft mat