Saturday, June 30, 2012

Tim Hotz 12 Tags A Year - June 2012

Yey!!....  I just finished my June Tag for Tim Holtz' 12 Tags a Year.  I'm still making them ATC size, and so far I'm keeping up!  This month I almost didn't make it but here it is....


and another shot...  I enamel embossed the tag and I think that and the shine from the film strip my camera seemed to have trouble locking onto the image and taking a clear shot.


I started with a Graphic 45 tag from the "On the Boardwalk" and colored her with my Distress Markers, borrowing from Tim's technique of coloring on a photo.  I added the film strip and fun tickets at the bottom- and a gear with a little tag from the same ticket sheet which I covered with an epoxy circle.  I mounted the tag on a 2 x 3 piece of harlequin print from my 6x6 Authentique pad: "Celebrate".
Supplies:
Paper:  Graphic 45 - On the Board Walk, Authentic, Celebrate
Ink:  Ranger Perfect Medium, Wow Clear gloss ultra high embossing powder, Ranger Distress Markers, Barn Door, Mustard Seed, Faded Jeans.
Embellishments:  Tim Holtz, filmstrip, and gears. misc trim and twin. epoxy sticker

Saturday, June 23, 2012

The Rubber Cafe'- Fabulous Phrases tags, and Gift Box

Today my post is being featured over at the Rubber Cafe' blog, which is full of fun color inspiration, and techniques. In addition I have a small tutuorial on how to use what's becoming my current favorite tool, the Stamp-a-ma-gig! It's so helpful when you want to make sure your stamp positioning is always right on. 
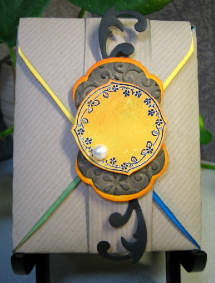
First of all here's my project, a set of tags and a cute gift box to put them in!


The colors for my tags were inspired by a pillow I made during CKU- I love the colors and how cheery the combination made me feel. Hopefully that is the feeling these tags will bring to my lucky recipient as well!

Here are some other views of the box itself- open and closed. This box was simple since I just had to use my Silhouette to cut and size to fit my tags. I lined each flap with color and the closure is a simple band. Mimicing the tag shape and another Fashionable framed stamped and ink embossed for the center.

The decorative band slides off to allow eacy access from the top - where inside there is just enough room for 8 tags.


To create the tags, I embossed and diecut the tag with a Spellbinder Label set, and used a Spellbinder textures folder for additional dry embossed affects. Black Soot from Ranger Distress inks were used to bring out the raised areas.


Each tag, has a different phrase stamped on it from The Rubber Cafe's - Fabulous Phrases set.
Giving you a tag for any occasion!

To guarantee the accurate placement of my phrase, I used my Stamp-a-ma-jig. Even with a clear block I find these phrases are easier to line up for perfect placement if I use my Stamp-a-ma-jig.
Here's a quick tutorial. You can use this with phrases, or image stamps, for plain stamping or special masking techniques. Overall a great tool when accuracy really counts!

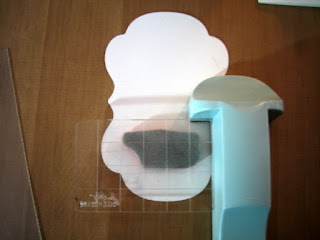
1. Start by taking the plastic template provided with your Stamp-a-ma-jig. And line up the corner to your tool, I took my stamp mounted on a clear grid block, which is also lined up with the corner of the tool and stamped on the plastic guide. (Don't use Sta-zon when creating this guide, it does not clean off the plastic template well) how perfect the coverage is not important you just want to get a clear enough image for placement.


2. Now take your plastic stamped template and place it over your paper and line it up where you want your phrase or image to be.
3. Once the template is placed where you want, take the Stamp-a-ma-jig and once again, align the corner of the plastic template inside the corner of the tool.


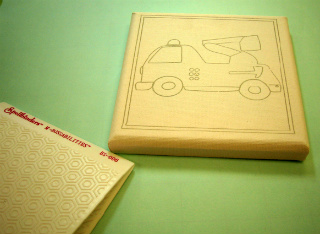
4. Firmly holding the tool in place, carefully remove the plastic template, with your image, and replace it with your stamp and block image already inked and ready for stamping. Carefully stamp, lift off and ...


Oila! A perfectly placed and aligned image!


To embellish my tags, I used the flourish and simple flower from The Fashionable Frames set, stamping them both on Glossy White paper, with Black Archival ink.
I used clear embossing powder, providing a simple resist technique so I could rub Distress inks with a sponge over the entire frame. After I fussy cut out the frames I popped them up with foam dimensional adhesives directly to the edge of each tag. The simple black flower was punched with a 3/4" circle punch, and popped again with another dimensional pop-dot. In the center I adhered a pearl embellsihment.
Here's a closeup view of each tag. I made 2 each of 4 different colors for a total of 8 Fabulous tags!
A small black flourish from a Spellbinder die set, was added as a finishing touch!


Well that's it, Inspiration, color, technique and a tool-tip all in one!
Enjoy the rest of your weekend!
Supplies:
Stamps: The Rubber Cafe' - Fabulous Phrases, and Fashionable Frames
Ink: Black Archival Ink, Memento Black Onyx, clear embossing powder, Tim Holtz, Distress Inks, Blue Denim, Marigold, Ice Spruce, Stampin'Up Yoyo Yellow
Paper: The Rubber Cafe' -White Pugnacious cardstock, Stampin'Up! -Colored cardstock, Misc Kraft and black cardstock
Adhesives: The Rubber Cafe' - Scrap Happy Glue, Dimensional pop-dots
Embellishments: Adhesived back Pearls, large brass eyelets, misc black white stitched ribbon
Tools: Spellbinders Nestabilities label Dies and M-bossibities- Elegance,  Stamp-a-ma-jig, Crop-o-dile, Silhouette -Cameo

Sunday, June 17, 2012

Happy Father's Day!

Today is Father's day, so I thought it was only fitting to focus my post on my own Dad.   I was blessed with not just a great Mom, but I also had a wonderful Dad, who I don't get to see very often but feel his influence in my life even now every day.  His words of wisdom, and years of guidance and yes, even the lectures!  come to me whenever I need them most.

There is so much I could say but I think this quote I found by Jim Valvano says it all...

"My Father gave me the greatest gift anyone could give another person, he believed in Me."

Today living in California so many miles away from my family I know I would never have had the courage to pack up my car and drive across country from Minnesota, and be the independent strong individual I've become if not for that faith and constant support I had from him growing up. 
So Thank you Dad, for letting me be all that I can be...  I'm still working on perfecting that - but believe I'm on the right track.

I have a few pictures to share - a now and than kind of thing....

Now.....

 
& ......then


I love this one of him with my Sister and I! (I'm the one with the red socks) He has such a great sense of humor and could always make us laugh!


 I'll leave you with a project I shared with you on one of my first blogposts -


And some closeups...


Hope you get some time with that special Dad in your life! 
I need to go call mine and tell him I love him!

Have a great day...

Wednesday, June 13, 2012

Winner's Announced for the Rubber Cafe' -Faber Castell Blog Hop


The SAD news is the The Rubber Cafe / Faber-Castell DMC blog hop is over, but the GOOD News is they've  announced the winners! 

For The Rubber Cafe $25 gift certificate we have two winners:

Sue D and Bethany Becker!!

Faber-Castell DMC has also announced their $50 prize pack:

Melanie Corbin

For more details hop on over to The Rubber Cafe' Blog and catch Michele's post today!

A BIG THANK YOU to everyone who particpated and stopped in to visit during the hop and I especially appreicate all your wonderful comments!  Congratulations to the lucky winners!!

have a great day!!

Saturday, June 9, 2012

Spread Your Wings!


 I decided I just couldn't let all the earlier board prep with my gelatos go to waste so here's a very simple card - usng the blue board I created for the Blog hop I showed you earlier this week. For my blue board, I had used 3 different colors of blue Gelatos from Faber-Castell Design Memory Craft, once I had colored my layers - I spritz the area with water mister, took my brush and blended until I had the effect I liked.


Since the background was already prepared, the rest will be pretty simple! I decided to feature the "Trailing Butterflies" stamp from The Rubber Cafe'. In this card I'm using the small set but there is also a large set and both can be seen here.


Taking my background paper, I dug out my Creative Memories, curved ruler - and cut it in pieces to create even more interest. When I applied the pieces to my Kraft card base, I made sure to leave about an 1/8" spacing. I really like the movement the curved lines give my card.

I stamped the phrase Spread Your Wings- directly on the lower portion of my card. And stamped and colored a cluster of Butterflies. I stamped the butterflies again on white water- color paper, colored them and 'fussy' cut them out adhering them with pop-dots.


Finally to finish my card, I cut 2 slits and pulled my gingham ribbon through tieing the ends into a bow. I used a button to help anchor my bow. The Gingham rbbon was black and white however I used my copic marker, and colored it to get the warm yellow orange color to match the butterflies.

Here's another view.


That's it! - have a great weekend and thanks for stopping by. 
Remember keep on going down to catch the post for the Blog hop.  

Supplies:
Paper- Water color paper , Kraft Cardstock
Adhesive: Taperunner and Pop-dots
Embellishments: Ribbon, Graphic 45-chipboard button

Wednesday, June 6, 2012

The Rubber Cafe' and Faber-Castlell Design Memory Craft Blog Hop

Welcome to The Rubber Cafe/Faber-Castell Design Memory Craft blog hop!
 
If you've just joined us today and would like to start the blog hop from the beginning, simply click on The Rubber Cafe blog to begin. If you've come here from Kristine's blog, you are in the right place!

For this blog hop, we will be showcasing project ideas, inspiration, and tutorials featuring fabulous products you won't want to miss! Hop along with us as we work with products from these great companies:
The Rubber Cafe
The Rubber Cafe is a stamp manufacturer of high quality, deeply etched stamps and other fine paper crafting tools and accessories. All of our beautiful stamps are made right here in the USA in sunny San Diego, California! Visit The Rubber Cafe today to view their complete product line!

Faber-Castell Design Memory Craft

Faber-Castell was founded more than 240 years ago in Germany as a pencil manufacturer. Today Faber-Castell is world renowned for its high quality, professional art supplies in the Art & Graphic line, as well as its fine writing instruments and accessories. Too see their complete product line, visit Faber-Castell Design Memory Craft today!

Now for the fun part - today I have 2 projects to share, once I got started, I quickly found there was so much I could do to create and showcase these wonderful products!  First I have a simple card, 'You Make me Smile".


To make this I started by creating 2 boards of gradient color, I primarily used Gelatos to do this, after coloring on my water color paper I spritzed with water then using the brush provided, blended the gelatos until I had a nice gradient of blue down my page.  I repeated this step with orange and white both turned out great!   The Yellow you see is a yellow water color pencil also from Faber-Castell Design Memory Craft, and helped to finish off my rays of sunshine I was going for!

 For my card, I decided to go with the yellow-orange gradient board.  For the next step I ran this through my Big Shot using my M-Bossibilites So Trendy texture envelope from Spellbinders, this has a chevron pattern on one side and geometric pattern on the other.


Here's another view of the Spellbinders M-Bossibilities So Trendy with the geometrics side out, my sample shows the chevron texture. 

These are so neat, as you get two patterns for the price of one- just by turning them inside out!

Once embossed I cut out varying slices for my 'rays' of sunshine.  I positioned them slightly spaced and trimmed any excess to fit my card.


To finish I stamped the phrase "You Make Me Smile", found in the Fabulous Phrases set from The Rubber Cafe'- I cut it out and layered with  Spellbinders' Pinked edge Circle dies, and popped it up with dimensional adhesive.


For my 2nd project I used 5" canvas square I got from the Michaels' dollar bin.

I used the Textural Sampler set provided by Faber-Castell Design Memory Craft - and prepared my canvas by first applying 2 coats of the gesso, to cover the pre-printed design.  I also covered this with a tan packaging tissue paper I had which I adhereed with the Gel Medium.

This time I used the M-Bossibities in my project as a stamp.  
                                                        

I used the Mixed and Match Gelato metallics set to color my M-bossiblities and after spritzing it with water pressed it it into the canvas to create the blue sky and repeated it with green to create grass.  Once dry - I stamped the background text stamp from the Steampunk set. The barn roof and rooster weather vane I cut with my Silhouette Cameo machine.  Before adhering the barn, I stamped it with the Wood Grain stamp again using black gelato colored directly on the stamp then spritzed with water, and stamped it directly to my barn diecut.      
                                                                

I created my phrase Rise 'n Shine using the alphabet set from The Rubber Cafe' -Candi Stamps-Alphabet - this is a great little clear acrylic set of upper and lower case typeset letters - perfect for projects like this.  I stamped it all at once but thought it would be fun if I cut the letters out Ransom note style before adhering to my project. I stamped on white paper but colored them with warm grey copic to better match the rest of my project.


To adhere all of my elements to the canvas I used the Gel Medium provided by Faber-Caster Design Memory Craft, and also used their Glaze to finish it.  I loved all 3 of these products they went on so smooth, and the finishing glaze really popped all that great colors provided by the gelatos! All of these products come in the Textural Accents sampler,  were so easy to apply and fast drying, making all the steps and layers very easy.


Well that's it for me!  For your next stop on the hop, you'll be visiting Heidi, who I know will have a project to Wow you!

Don't forget to leave a comment on each manufacturer and designer's blog for a chance to win great prizes such as:

Faber-Castell Design Memory Craft will be giving away a $50 Gift Certificate!

The Rubber Cafe will be giving away a TWO $25 Gift Certificates!

The blog hop contest will be open until midnight June 10th and the winners will be announced on June 12th on the company's blogs.
Just in case you get lost along the way here is a complete list of the designers participating in our blog hop:

START AT: Rubber Café 

Karen Thede      **you are here!!


Supplies:
Paper:  90 lb Water Color paper
Adhesives:  Stampin'UP -Dimensionals
Tools:  Spellbinders M-Bossibilities- So Trendy; Silhouette Cameo diecut machine
Other:  Michaels' 5x5- Square Canvas