Sunday, May 24, 2015

Stamping on patterned paper Grad card - Creative Cafe'

Hi Everyone!

I have a fun and simple layered card today that I think would be a perfect card for that special Graduate in your life as well.

I've combined some simple stamped phrases with the patterned paper from our kit -MME -Hello World!  And that piece is built on a background piece of  yellow cardstock cut 4 1/4" x 5 1/2, with 2 rows of cars bordering on each side.

So here's a look at my finished card, follow-along and I'll tell you how I constructed this simple card.


Check out my full post over on The Rubber Cafe' - here-
 

Saturday, May 16, 2015

Travel Journal Part 2 -

Hi Everyone!  Well I'm back this weekend as promised to show you how I finished the inside of my Travel Journal.  For those of you who just tuned in, here's a link to the tutorial here that I created last weekend as well as a view of my cover below- 

 
Follow along and I'll share how I finished the inside.  First of all my notepad was originally a Class Assignment Schedule notepad, so there are dates I wanted to reuse but I wanted to cover up the word 'Assignment'  at the top of each page.   Second, these note pages are very light weight and I didn't want to have ink leaking through to the other side, so before stamping I took my ATG tape runner, and adhered 3-4 pages together still leaving m 10-12 days for journaling my trip!

With my pages prepped, I went ahead and started stamping.  For the global image below, I first masked off at the line to only stamp in the upper margin as you see below.

 
Get the rest of my post and tutorial on how I completed my travel book here
 

Saturday, May 9, 2015

Travel Journal Tutorial - Featuring Creative Cafe' kit for May

Happy Saturday Everyone! Today I want to share with you a quick tutorial on how I created a Travel Journal using a purchased notebook from my local grocery store office supply area. Here's a look at the front of my finished book - the ribbon you see coming out of it at the bottom is a bookmark I inserted along the way! 


 Head over to my post today at The Rubber Cafe' - to see the tutorial and more!

Saturday, May 2, 2015

Desk Organizer Using Topography Line from G45

Last weekend, I went to a Charity event for the Pregnancy Resource Center in Vista called Crafting for Life- this was their 5th Birthday, and we managed to raise roughly $27,000.00 dollars.

The past couple of years, I've attended and assisted my friend 
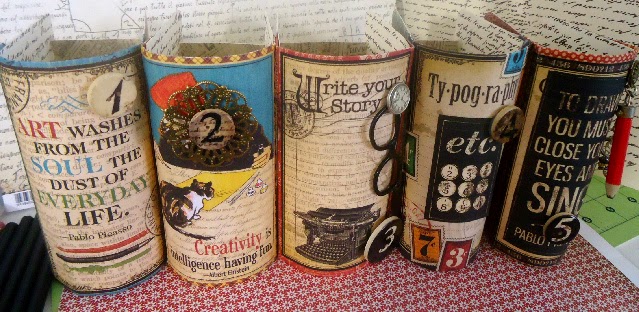
Gloria Stengel, (check out her class on her blog here) as she always graciously donates her time and supplies to teaching a few classes during the event.  This year, I went just as a normal participant, so I decided to work on a project I saw a few years ago, from one of the G45 Designers- Olga Struck,  I loved that it just required a few papers from the line and something I already had in my 'stash'!  Her creative slant to making each container look like a book was ingenious!  To embellish I went again to my stash and pulled out some metal embellishments and wooden numbered buttons to give them some added character.

Here's a look at mine - if you want to see how to make these Olga has a tutorial over on YouTube here, that's easy enough to follow-  I admit I had some trouble using her measurements, so kind of went on my own there.


I made 5 - and as they stand they are loose and not connected.  I'm toying with the idea of creating a base for them to be anchored to.

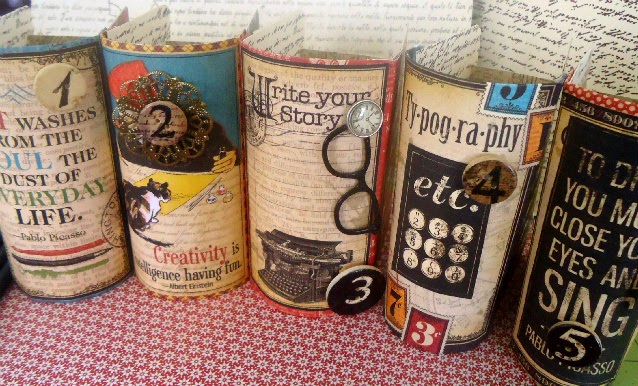
Here's a little closer look -
I also think I'm going to put a layer of Rangers' Glue 'n Seal to help give some more durability.

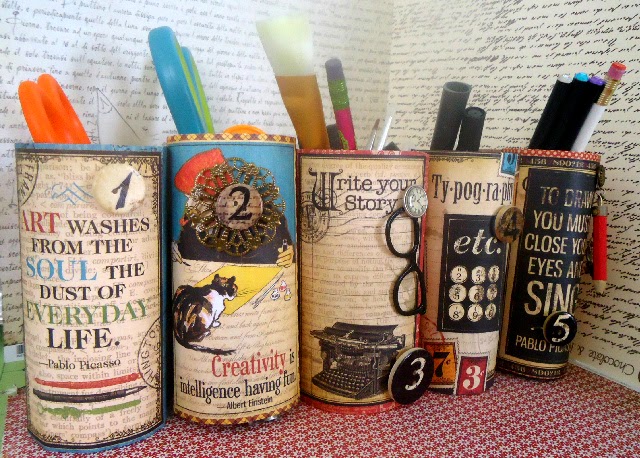
 Thanks for stopping by - hope I've inspired you to give Olga's Desk Organizer try!